Lossy Compression of RAW

There has been some discussion recently thanks to the huge pixel count of Nikon’s D800 regarding the size of the NEF (“raw”) files.  They’re 75MB, 14-bit, uncompressed.  Nikon offers a form of lossy-compressed NEF but a lot of people think this is a Bad Thing™ because they know that JPEG is “lossy” and everybody knows that is bad.

However, it’s not proper to compare the two.  JPEG compression has quality problems because it loses information between pixels causing noise and artifacts around sharp edges (text being the best example), and because it loses some resolution (the number of bits worth of color detail) as well resulting in somewhat less than 8 bits of information per channel.

JPEG loses information you would not normally see.  Nikon’s NEF compression loses information you cannot use.  Let me explain…

Continue reading Lossy Compression of RAW

Kids and Money

I thought I’d take a break from Photography for a few minutes to talk about money. Specifically, about kids and money.

A study done (sorry, I can’t find the reference) in the USA showed that wealthy families are far more likely than middle-class or low-income families to teach their children about managing money. If you want your kids to be financially stable, or even outright successful, then we as parents need to teach them from a young age.

How? Start by giving them an allowance; $1 per year of age per week is a good starting point and it needs to be divided into categories such as “spending”, “savings”, “investment”, and “charity”. For proportions, 10% for the latter two is a good number and then divide the remainder equally between the first two. Round it nicely. (e.g. $8 => $3, $3, $1, $1) spending=”anything”; savings=”important things”; investment=”for retirement”; charity=”given to those less fortunate”

When? A child should start learning about money as soon as they are able to understand than a dime, though smaller, is worth more than a nickel. Physical spending money should come as soon as they can make change. My personal experience says that 7 years old seems the right time. 6 was a bit young.

Why? Because it’s our responsibility as a parents to teach our kids and that’s what we’re doing here. I don’t personally believe in paying an allowance in exchange for chores around the house — in our family, doing chores is how you contribute back to the family; the kids don’t get paid for their chores any more than I get payed for cooking or doing dishes. I give an allowance for the same reasons I give them food a shelter: It’s a necessity of life and I want them to learn about it when the mistakes will be small and harmless.

Once the child has money of their own, they need to be taught how to spend it wisely. They can divert “spending” into any of the other three categories or “savings” into “investment” but there’s no going the other way. If they want something for themselves, let them buy it, even if you think it’s wrong. Explain what something costs in terms of what else they could have instead (the “opportunity cost”) but in the end, abide by their decisions. It’s their money and they need to be allowed to make mistakes.

Encourage them to buy their own gifts for others on Christmas or birthdays rather than ride on the gifts from parents. I contribute 1/2 the cost when they’re buying for others. (…though gifts made by hand are still better, in my opinion.)

Make them pay if they break or lose something that then has to be replaced, like a windbreaker or winter gloves. I pay 1/2 of that, too, simply because it’s not practical for a $8 allowance, of which only $3 is available for reimbursement, to pay the full replacement cost.

If they’re short, be willing to loan them some money but set a strict repayment schedule and charge interest. 0.5%/month (6%/year) is an easy amount. That’s how the real world works so they might as well get used to it.

[comment]

Continue reading Kids and Money

An Open Letter To Camera Manufacturers

Silicon is found everywhere today. What used to be the domain of nitrocellulose, emulsion, and mechanical components is now light-reactive silicon, software algorithms, and computers. Inside even the simplest digital camera is much the same components you find in your desktop PC: a CPU, Input/Output, and Memory. (My CS-101 professor woud be so proud that I remember the basic building blocks of any computer.)

What I find personally frustrating is that I cannot use the computer inside my camera in any way other than what the manufacturer intended. Who today would be happy buying a home computer that could only run the software installed at the factory?

Why is my camera not programmable? Why can I not load new abilities onto it just as I do at my desk? Even my phone takes new programs!

What I want to see is a camera that has a language from which I can write programs to control its functions. This could be Python, Java, or even Pawn. It should be obvious from history that as soon as something is completely flexible, people start using it in ways that were never expected.

I like night photography, but the High Dynamic Range of such exceeds the capabilities of modern-day digital sensors. To compensate, I take multiple exposures with different shutter times and merge them using special “hdr” software.

The mixing is a fairly easy process with the exception of the alignment of the photos. Even with a tripod, touching the camera to change the shutter time moves the camera slightly and the resulting photos end up offset by a few pixels in some direction.

If the camera were programmable, I would have it take multiple exposures all by itself,
stopping automatically when it has all that are needed. I would write something like this:

function TakeHDR() {
    raise mirror        // do it once for all shots
    wait 5 seconds      // let mirror shake settle out
    let T = 30 seconds
    do {
        set shutter time to T
        take photo
        save photo
        let T = T / 4   // next at -2 stops exposure
        create histogram of photo
    } while (photo has any pixel's R,G,B at maximum value)
    lower mirror
    signal "all done"
}

With that simple program, I’d get a series of shots, each 2 stops faster in exposure, until there were no overexposed pixels. Because there was no need to touch the camera, all of the images would be perfectly aligned.

How important is this feature to me? I would actually consider switching my equipment from Nikon to another to get this.


Planet Sydney

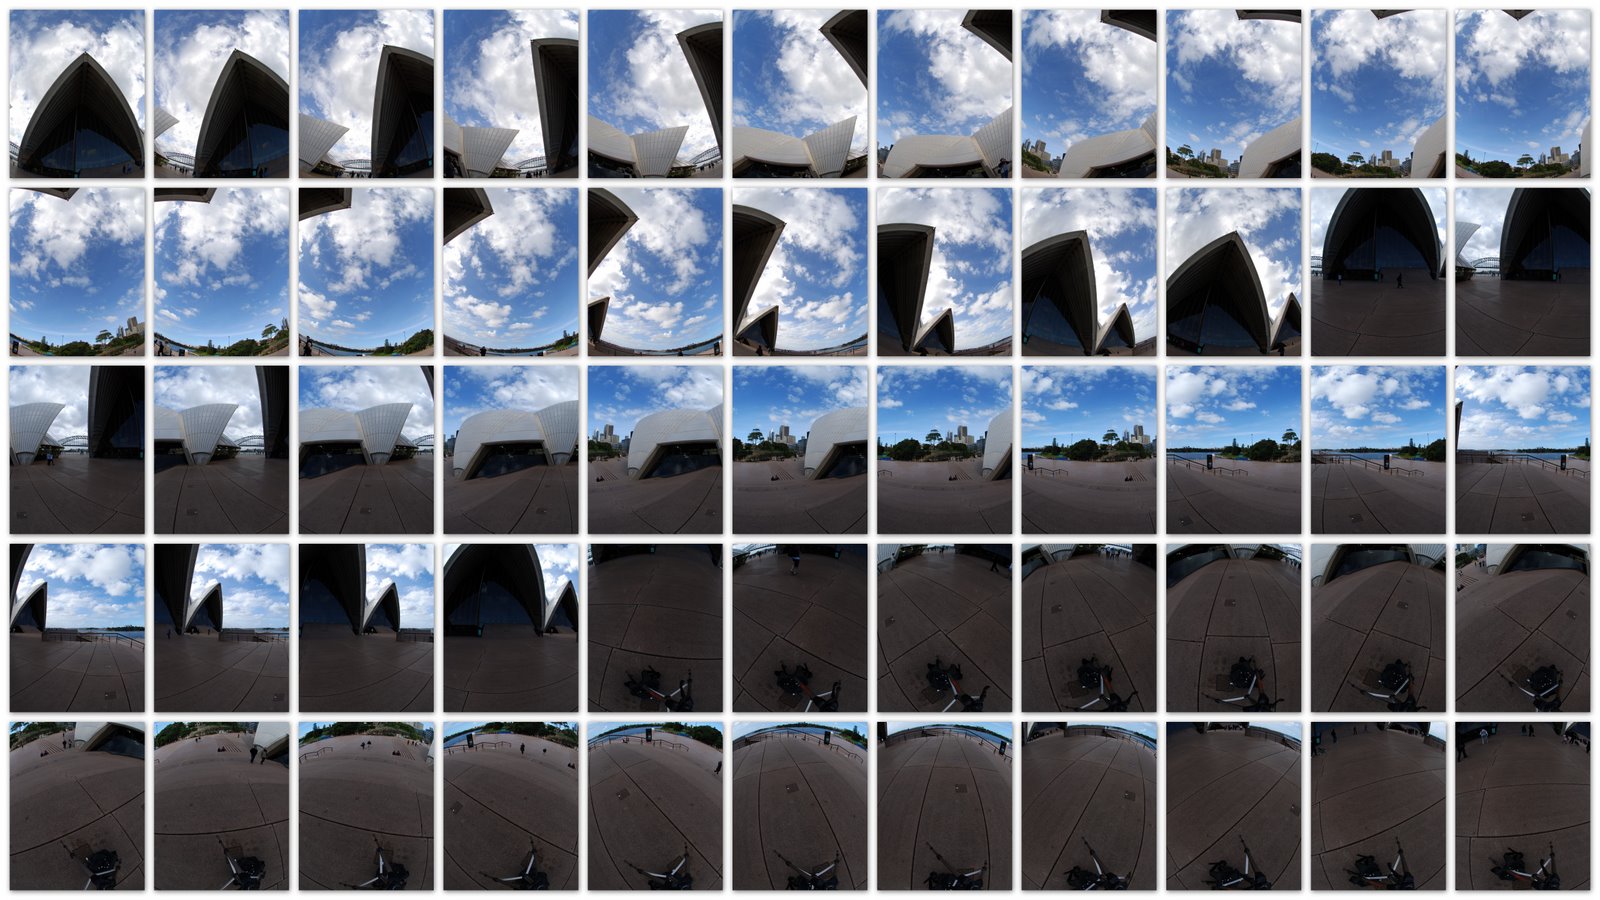
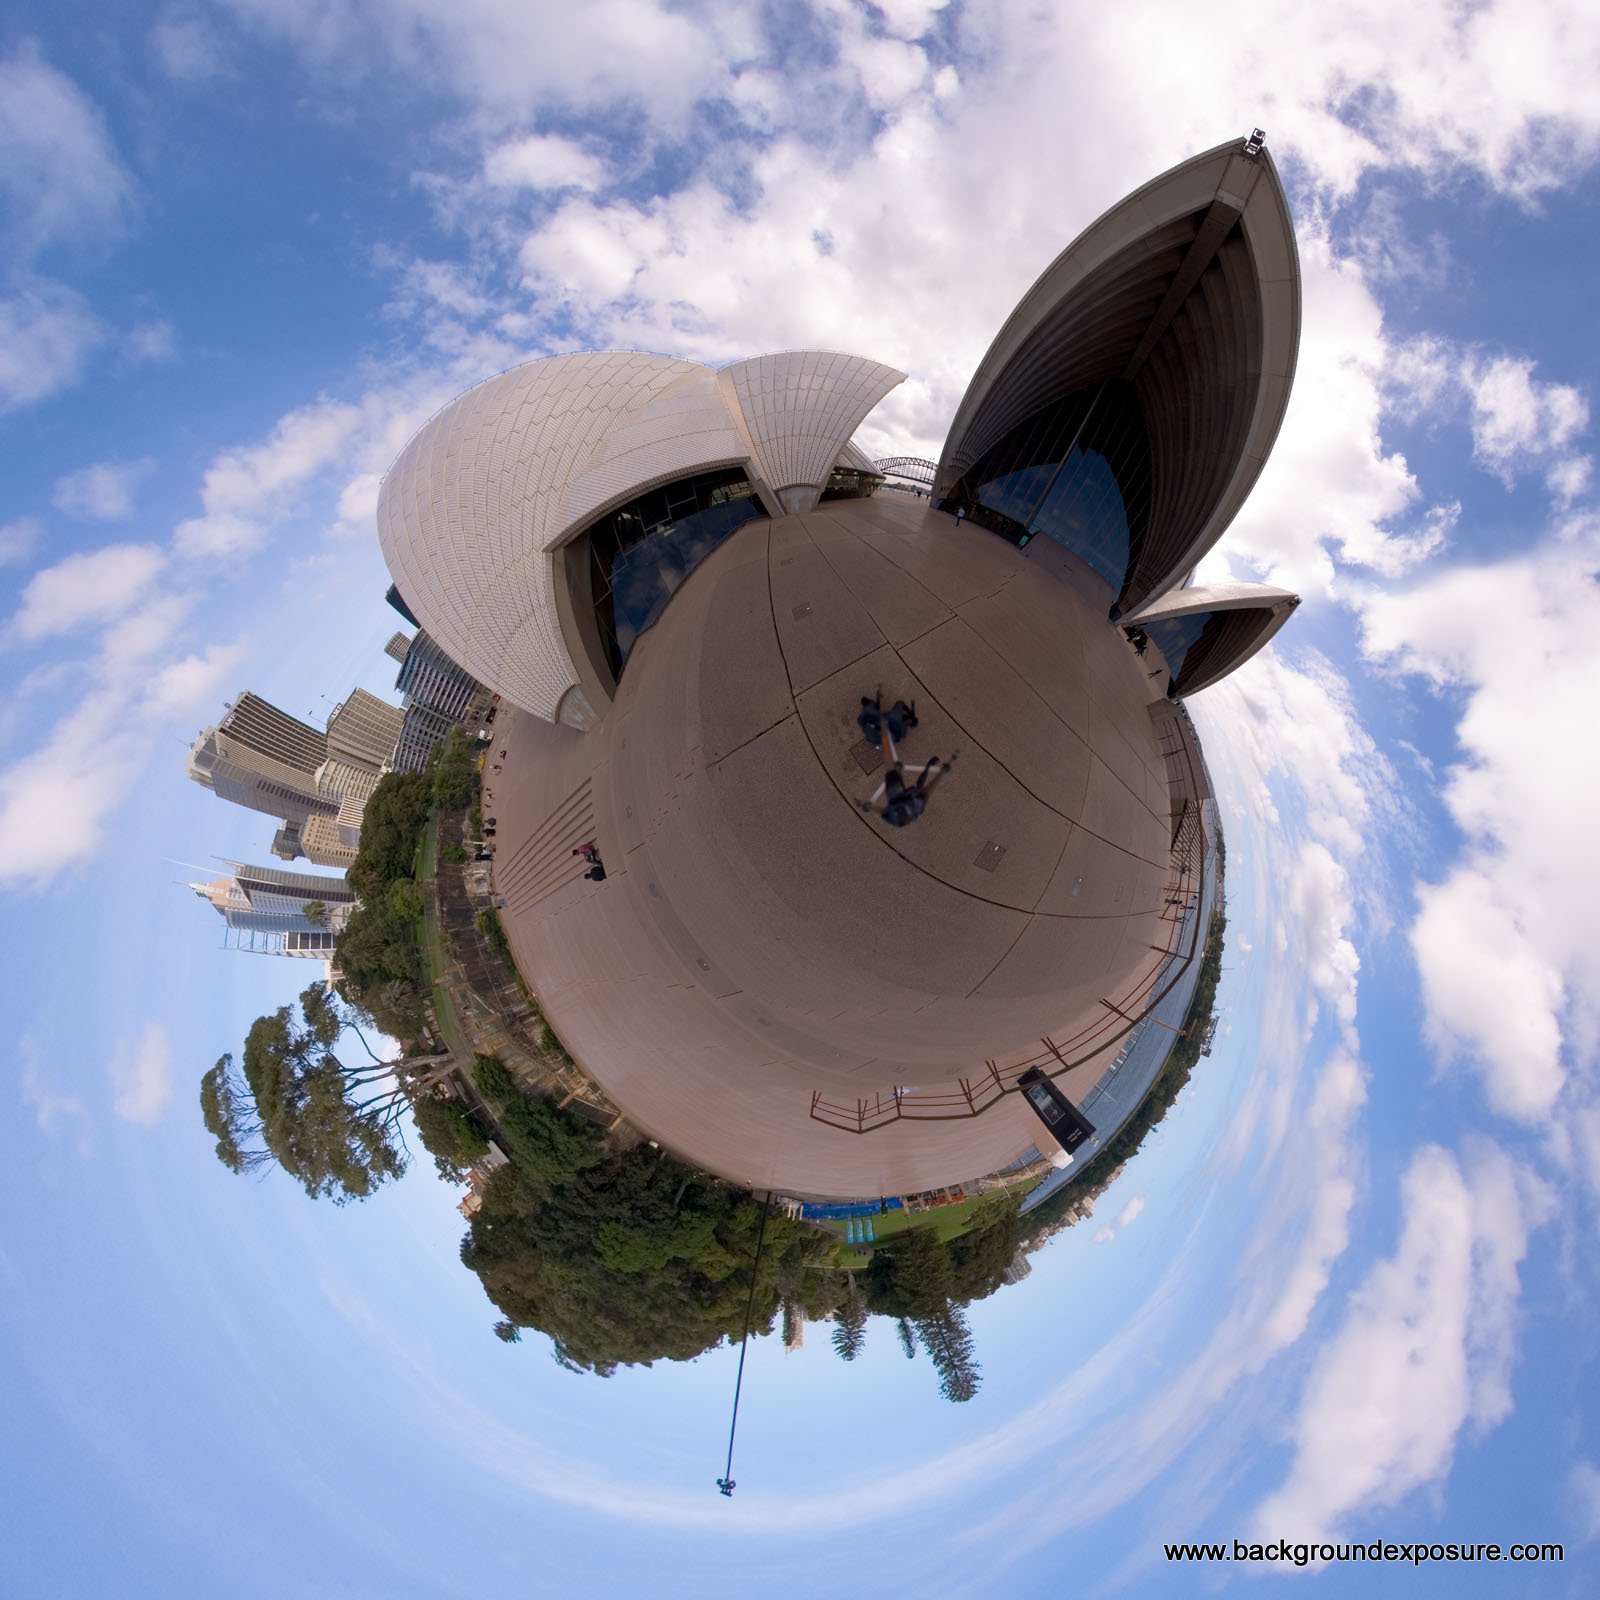
When a site with “little planet” images was first shown to me, I knew it was something I had to try. So during my recent visit to Sydney, I took the opportunity to capture the full sphere around me. I bought a 10.5mm (DX) fish-eye lens a couple years ago and this was the perfect application. Covering 180° corner-to-corner, or about 100° in one dimension and 75° in the other, you can capture the entire scene in as little as 12 images, including a little overlap for stitching.
Opera-House FishEye
You can, of course, use any type of lens but since a full sphere has an awful lot of angular area to cover, you really want to capture as much per image as possible. And since you’re going to be warping the images in weird & wonderful ways, there’s no advantage in starting with a rectilinear (i.e. “normal”) lens.

If you haven’t heard, there’s a very common problem with capturing multiple images for stitching. It’s called “parallax” and it’s what makes close-by things appear to move faster than far away ones when looking out the window of a moving car. This affects your images when you rotate the camera to capture an adjacent area. If your camera and lens are not pivoting on the optical center of the lens (the point at which light appears to be entering it) then close things will move faster that distant ones as you turn and the final stitched image will have odd discontinuities at image boundaries. A standard tripod will move around the focal plane (the film or CCD sensor) which is not the same thing.

You can spend hundreds of dollars for a nice, heavy “panoramic mount” that will make this problem go away… or you can cheat. The trade-off, of course, is time and accuracy. The trick to reducing parallax errors is to push them to places where it won’t be noticeable after blending. The sky is usually the best choice but anything without long, straight lines will usually work.

Before starting, set everything on the camera to “manual” so nothing changes between shots. This is supposed to look like a single exposure when all is said and done. Take some quick shots in all directions and adjust the exposure so that you’ll capture everything.

Start by capturing the entire scene. A level shot every 45° (vertical mount) or 90° (horizontal mount) plus a few of the sky and the ground will ensure that you have everything. This is important because it’s easy to miss sections in the next step but having this will allow you to fill in any gaps.

Originals
Parallax error is generally only noticable when there are long, strait lines because they tend to become “broken” when stitched. Since there is never any parallax error within a single image, you want to capture anything with continuous lines in a single shot along with some soft boundary area on the edges and at least some of the stuff on the other side of that boundary for joining. Later you can force the stitching seams to be in this boundary region where they will not be (overly) noticeable. You can make life easier for yourself by not having wide or tall things close by. For example, don’t set up next to a guard railing. These will almost certainly not fit in a single frame and yet have the biggest parallax errors.

Once the images are captured, they have to be warped and stitched. You can pay an obscene amount of money for PTgui or you can use the free Hugin software. There’s no question that PTgui is more robust and has a nicer user interface but there’s no difference in the final output quality. In fact, PTgui uses many of the same (free) back-end programs such as “nona” and “enblend” when creating the final image.

The most time-consuming part of the stitching process is defining the control points. Both programs mentioned above have built-in automated tools to create control points but don’t use them! You want to do this by hand and only add control points along or on either side of the intended seam. Placing control points elsewhere in the image is detrimental since the program will sacrifice some accuracy in the important points to try to satisfy these unimportant ones. You want these boundary regions to align after warping because that is where the seams will go and the closer the areas match between warped images, the less noticable the seam. What happens elsewhere, where there are no seams, isn’t important since we’re distorting the final image so much that any error won’t be noticeable.

To get the “tiny planet” effect, use a “stereographic” or “stereographic down” output with about 300° on both the horizontal and vertical. When you preview the output, you’ll likely find that it looks “wrong” but it’s just a matter of setting the center to where the tripod can be seen. Then you can push, pull, rotate, etc. the preview until you get the general result you want.

Now render the final result. If you’re supremely lucky, the blending program will automatically place the seams in the correct locations and you’ll be done.

However, if you’re not that person, it’s not going to be perfect and you’re going to have to adjust it by hand. To do this, render the output again but this time have it output all the individual images separately.

After loading the blended image into Gimp, Photoshop, or whatever, find the blending mistakes and load the appropriate image into a higher layer. You can then make transparent all of this new layer from the boundary areas outwards, effectively pushing the seam out to those areas. Rinse & Repeat until all seams have been fixed.

If the ground has lines, you’re going to find that the seams are noticeable. It’s going to take some work with Gimp or Photoshop to transform/warp various parts of the images to create something that doesn’t have noticeable errors. In the end, though… It’s all worth it!

Planet Sydney

About Face

I’ve been using the “K2” theme for WordPress from the beginning but decided I wanted to try something that will use a bit more of the available horizontal space on a typical browser.  I’m quite impressed with the “Atahulpa” theme.  It’s amazingly customizable even without knowing any HTML/CSS.

I’d be happy to hear what you think of the new layout compared to the old.

Old K2 Theme